Installing your own septic tank system represents a significant undertaking that can save thousands of dollars in professional installation costs. DIY septic tank installation requires meticulous planning, technical expertise, and strict compliance with local regulations. Before embarking on this complex project, homeowners must understand the comprehensive requirements and potential challenges involved in proper installation.
Table of Content
- Pre-Installation Requirements
- Planning and Preparation
- Step-by-Step Installation Process
- Safety Considerations
- Common Pitfalls and Solutions
- Maintenance Requirements
- Frequently Asked Questions About DIY Septic Installation
- Septifix
- Septic Permit Links by State
Pre-Installation Requirements
The success of your DIY septic tank installation heavily depends on thorough preparation and adherence to local regulations. First, contact your local health department to obtain necessary permits. Most jurisdictions require detailed system designs and comprehensive soil analysis before granting approval. A percolation test, which measures soil drainage capability, is mandatory and must be conducted by a certified professional. This crucial test determines whether your soil can effectively filter wastewater and supports proper system functioning.
Local regulations typically specify:
- Minimum setback distances from property lines
- Required distance from wells and water sources
- Depth requirements for system components
- Specific materials and construction methods
- Inspection schedules during installation
- Documentation requirements for final approval
Additionally, you’ll need to carefully review property surveys and obtain detailed utility maps. Understanding the location of underground utilities is critical for safety and compliance. Calculate your household’s daily water usage and peak demands to ensure proper system sizing. This calculation should account for future household expansion and seasonal variations in water usage.
What Are Some Home Septic Care Tips?
Planning and Preparation
Successful DIY septic tank installation demands extensive planning and resource allocation. Create a comprehensive site plan that accounts for topography, drainage patterns, and existing structures. Your planning phase should include detailed material specifications and equipment requirements.
Material Requirements
The following materials are essential for proper installation:
- Septic tank (available in concrete, plastic, or fiberglass)
- Distribution box with proper baffles and outlets
- Schedule 40 PVC pipes and appropriate fittings
- Clean, crushed stone for drain field construction
- High-quality filter fabric for soil separation
- Risers and secure access caps for maintenance
- Pipe joiners and waterproof sealants
- Ventilation components and filters
- Sand and gravel for proper bedding
Equipment Needed
Proper installation requires access to:
- Backhoe or excavator with appropriate attachments
- Transit level for precise grading
- Laser level for accurate pipe placement
- Soil compaction equipment
- Concrete saw (if needed)
- Hand tools and measuring equipment
- Safety barriers and warning signs
- Dewatering equipment for high water tables
What Are the Signs of Septic Issues?
Step-by-Step Installation Process
Site Preparation
Proper site preparation is crucial for long-term system performance. Begin by:
- Marking all utility lines and establishing setback boundaries
- Clearing vegetation and removing obstacles
- Creating access routes for equipment and materials
- Setting up erosion control measures
- Establishing grade stakes and reference points
- Installing temporary drainage systems if needed
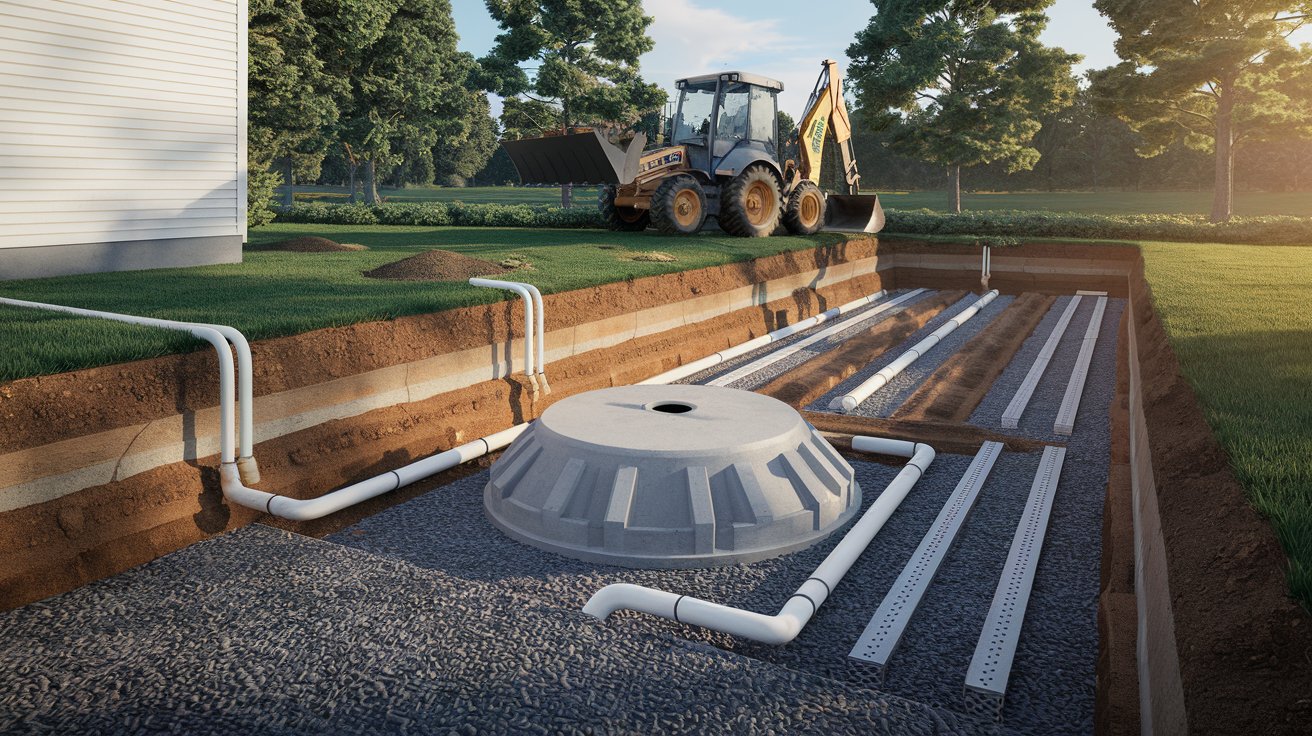
Tank Placement
Tank installation requires precise execution:
- Excavate the tank hole according to manufacturer specifications, allowing for proper depth and orientation
- Create a level, compacted base using crushed stone or sand
- Check base elevation and compaction multiple times
- Lower the tank using appropriate lifting equipment and chains
- Verify tank level in all directions
- Install and seal all tank connections
- Test water tightness before backfilling
- Install risers and access ports
- Document installation with photographs
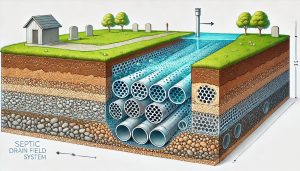
Drain Field Installation
The drain field system demands careful attention to detail:
- Layout and excavate trenches to specified depth and grade
- Install distribution pipes with proper slope
- Add appropriate layers of gravel around pipes
- Place filter fabric to prevent soil infiltration
- Install inspection ports at key points
- Backfill carefully to prevent damage
- Grade final surface for proper drainage
Safety Considerations
Safety must remain paramount throughout the installation process. Essential safety measures include:
- Wearing appropriate personal protective equipment
- Following OSHA guidelines for excavation safety
- Ensuring proper ventilation in excavated areas
- Maintaining stable soil conditions
- Having emergency contacts readily available
- Using proper lifting techniques and equipment
- Installing proper shoring for deep excavations
- Maintaining clear access for emergency equipment
Common Pitfalls and Solutions
Many DIY installers encounter specific challenges:
- Improper grading leading to system failures
- Incorrect pipe connections causing leaks
- Insufficient soil preparation affecting drainage
- Inadequate ventilation causing odor issues
- Poor compaction leading to settling
- Improper backfilling damaging components
- Insufficient documentation for inspections
To avoid these issues:
- Double-check all measurements and calculations
- Document each step with photographs
- Maintain detailed installation records
- Consult manufacturer guidelines frequently
- Seek professional advice when needed
- Perform regular quality checks
- Allow adequate time for proper completion
Maintenance Requirements
Proper maintenance ensures optimal system performance:
- Schedule professional inspections annually
- Pump the tank every 3-5 years based on usage
- Monitor water usage patterns
- Keep detailed maintenance records
- Check for signs of system stress
- Address issues promptly
- Maintain proper landscaping around components
Conclusion
While DIY septic tank installation offers significant cost savings, it requires careful planning, extensive knowledge, and meticulous execution. Success depends on thorough research, proper preparation, and attention to detail. Consider your technical abilities, available time, and local requirements carefully before proceeding. When challenges arise, don’t hesitate to seek professional guidance.
Frequently Asked Questions About DIY Septic Installation
How much money can I save by installing my own septic system?
On average, DIY septic installation can save between $5,000 to $10,000 compared to professional installation. However, these savings must be weighed against equipment rental costs, potential mistakes, and time investment.
Do I need a permit to install my own septic system?
Yes, all septic system installations require permits from your local health department or environmental agency. Installation without proper permits can result in significant fines and mandatory system removal.
Septic Permit Application Tennessee
Septic Permit Application Florida
How long does it take to install a septic system yourself?
For an experienced DIYer, installation typically takes 7-10 days, weather permitting. This includes excavation, tank placement, drain field installation, and initial testing. Permit approval and soil testing may add several weeks to the timeline.
What size septic tank do I need for my home?
For a typical three-bedroom home, a 1,000-gallon tank is usually minimum. The exact size depends on:
- Number of bedrooms
- Number of occupants
- Local regulations
- Daily water usage
- Soil conditions
Can I install a septic system in winter?
Installing a septic system during winter is not recommended in regions where the ground freezes. Frozen soil is difficult to excavate, and proper compaction becomes challenging. Spring through fall are ideal installation seasons.
What type of soil is best for a septic system?
Well-draining soils like loamy sand or sandy loam are ideal. Clay-heavy soils or areas with high water tables may require alternative system designs or professional installation.
How deep should a septic tank be buried?
Typically, septic tanks should be buried 4 inches to 4 feet deep, depending on local climate and regulations. The tank must be deep enough to maintain proper slope from house to tank while avoiding freezing issues.
What are the most common DIY septic installation mistakes?
Common mistakes include:
- Improper tank leveling
- Insufficient slope in drain lines
- Poor soil preparation
- Inadequate documentation for inspections
- Incorrect drain field sizing
Can I install a septic system on a sloped lot?
Yes, but sloped installations require careful planning and often need special design considerations. Sites with slopes greater than 15% may require professional installation or alternative system designs.
How long will a properly installed DIY septic system last?
A properly installed and maintained septic system can last 20-30 years. Regular maintenance, including pumping every 3-5 years and annual inspections, is crucial for system longevity.
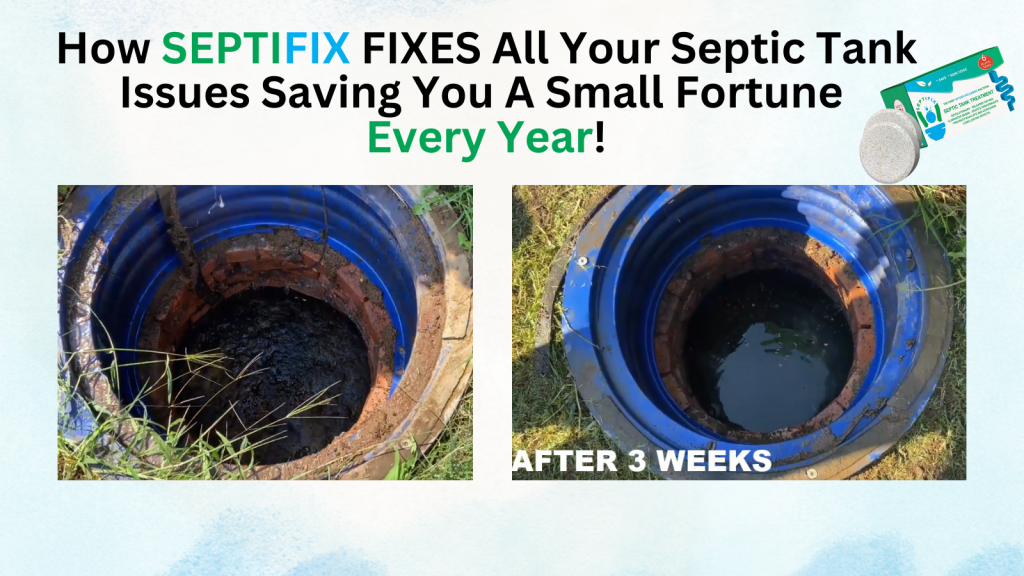
Septifix

Directory | Washington Septic Service Providers | Part 2

Directory | Washington Septic Service Providers | Part 1

DIY Repairs Are Always Cheaper

Septic Regulations in Rural Areas: Essential Guide for Rural Property Owners
The Role of Perforated Pipes in Drain Fields

What Happens During a Pumping Service?

Septic Tanks vs. Sewer Systems | Choosing the Right Option